There are many, many different ways to mount or install an H flume, some of them quite inventive! Here we’ll go over the basics of installing an H flume in an earthen or concrete channel. Keep in mind that these guidelines are just that: guidelines.
Below we will cover:
- How to Size an H Flume
- Installation Conditions
- Submerged Flow
- Small H Flumes
- Large H Flume
- Flow Tables
How to Size an H Flume
Proper sizing is the first step in successfully installing an H flume. This sounds pretty basic, but you would be surprised.
When sizing a H flume we want to look at four different flow rates:
- Minimum flow
- Minimum flows are generally not a concern for H flumes. The flow tables developed by the USDA (and available in their Field Manual for Research in Agricultural Hydrology) provide for measurable heads as low as 0.02-feet [0.6096 cm]. These levels are considerably lower than other flumes types and equate to flow rates as low as 0.00016 cfs [0.0045 l/s] for a 0.4-foot HS flume.
- Average flow
- Generally the guideline for sizing a flume is to develop the greatest amount of usable head at the average flow rate (assuming that the flow is relatively stable).
- Maximum flow
- Where total flow rates can be accurately modeled, verify that the H flume can handle the maximum anticipated flows.
- It is important to know that the USDA discharge tables for H flumes are calculated TO THE TOP OF THE FLUME.
- Unlike other flume discharge tables, THERE IS NO FREEBOARD above the maximum indicated flow rates.
- Where total flow rates can be accurately modeled, verify that the H flume can handle the maximum anticipated flows.
- Surge flow
- Unless the maximum flow rate is know with a degree of certainty, it is recommended that a peaking factor be applied to the maximum flow in order to ensure that the flume captures all of the relevant flows
In general, the recommendation is that smallest flume capable of handling the anticiapted flows should be selected. This will keep the purchase price lower, but keep in mind that it may require more in the way of work in forming the upstream transitions.
Installation Conditions
- Upstream conditions
- The upstream conditions should be such that the flow entering the flume is smooth, well distributed, and of the proper velocity
- Channel turns, splits, or elbows should be as for upstream as possible
- Other flow changes should be at least 3-5 D (the depth of the flume or maximum head) upstream
- The approach slope should be 2% or less (decreasing with flume size)
- Upstream bank heights should be considered so that installing the flume does not result in upstream overtopping
- Wing walls can be formed or manufactured to direct flows from wider channels / open spaces into the inlet of the flume
- Flume
- The flume itself should be level from front-to-back and from side-to-side
- The "v" shaped contracting is placed downstream so that flow can spill off the end
- Should sedimentation be a concern, the upstream channel can have a slight side-to-side angle to it to concentrate the sediments and direct them through the flume
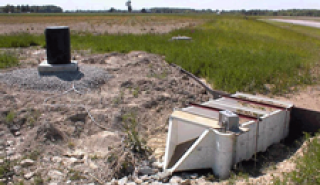
- In earthen channel installations it is important to make sure that flow does not bypass or undermine the flume
- The flume should be anchored or weighted down so that it does not float or shift out of position during installation
- When grouting in place, care should be take to ensure that the sidewalls / floor do not distort
- Downstream conditions
- H flumes have little resistance to submergence
- Where at all possible, the discharge from the H flume should be allowed to freely spill off the end
- Rip rap or other armoring of the downstream channel may be necessary to avoid erosion of the downstream channel
Submerged Flow
Submerged flow occurs when the resistance to the flow in the downstream channel becomes sufficient to reduce flow out of the flume. This in turn decreases the discharge velocity and increases the flow depth in the flume. The artifically high depth in the flume results in an overestimation of the flow rate. While corrections to the flow tables can be made, the calculations require multiple depth readings and application of cumbersome equations. Submergence transitions (St) for H flumes are quite low - 30% - so when at all possible, Openchannelflow recommends designing for free-flow conditions.
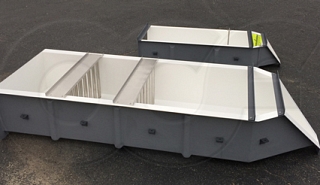
Small H Flumes
For the earthen / concrete channel installations covered here, it is common to run threaded-rod through either the anchoring clips on the outside of the flume, or up through the stiffening flanges running around the top of the flume. The threaded rod can then be cast into a slab or epoxied into place. The flume can then be leveled through the use of nuts / washers - just make sure to support under the floor of the flume if, after leveling, it is no longer sitting on the pad. The inherent rigidity of the HS and smaller H flumes generally means that they do not need to be fully embedded in earth or grout as would be the case with larger H and HL flumes.
Large H Flumes
Large H flumes generally require more involved installations than the smaller HS and H flumes. The larger flumes are typically earth / grout embedded so that the sidewalls are supported and that they do not shift out of place. Additionally, the greater flows have more erosive force than those encountered by the smaller flumes and, as a result, more attention should be paid to the potential problem of flow undermining / bypassing the flume.
Earth anchors or threaded rod run through the anchor clips can help to stabilize the flume during installation. Generally, though, they are not sufficient in themselves to avoid flume movement.
Packed earth and cast-in-place installations are recommended. Care must be taken, though, to ensure that the H flume sidewalls and floor do not distort during installation. This is usually accomplished by a combination of cribbing (interior reinforcement) and incremental backfill.
Cribbing can take many forms, but in its most simple, it is usally sheets of plywood lining the interior of the flume which is then braced or weighted down so as to evenly spread any installation stresses. H flumes are, as a class, much wider than other flumes of similar flow capacities and are, therefore, more susceptible to distortions. Coupled with the fact that the flumes are rated to accurately measure very low flow depths, and it is clear than distortions should be kept to a minimum.
The cribbing over the floor of the flume can be weighted down with sand bags or drums filled with water. The key here to remember is that the weight of the reinforcing should be as great as that of the grout - which is 2.5 times that of water.
When grouting large H flumes in place, make sure to leave enough access under / around the flume. Larger H flume may need to be set on concrete piers or blocks to provide enough base access and there should be at least 12 to 18-inches [30.48 to 45.72 cm] of clearance on each side. Pours should occur in lifts of no more than 6-inches [15.24 cm], with the base of the flume grouted first. When grouting the base of the flume, the pours should be in one direction. NO AIR SHOULD REMAIN UNDER THE FLUME. After the base pour has set, the sidewalls can then be grouted.