
YouTube user Pener Pã has posted an interesting video showing the installation of a Rectangular Weir Plate with End Contractions into a natural channel.
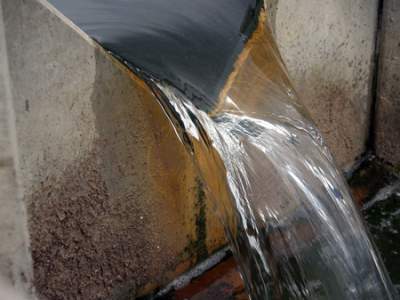
The video opens (up to 0:24) with the fabrication of the plate and its transportation to the installation site. Note that the plate is fabricated from plywood and then coated for water resistance. One thing the Pã has overlooked is the crest of the weir plate. ISO 1438 calls for the crest (edge where the water flows over the weir) to be no more than 1/8-inch thick. Otherwise the nappe (body of water flowing over the weir) may not spring clear or may erratically spring clear of the crest.
Ideally the weir crest should be made with 16 to 12 gauge T-304 stainless steel. It retains a crisp edge (you do not want a knife edge), is difficult to damage, and can be precision cut.
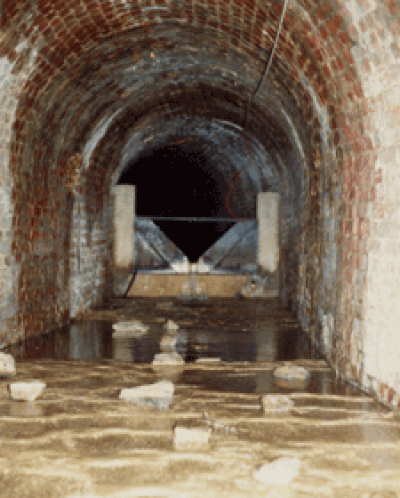
Upon arriving at the site, considerable effort is made to clear the area upstream / downstream of where the weir will be installed of trash, debris, and vegetation (0:25-0:42).
Using a pick, a groove for the weir plate to sit is in excavated in the sides / floor of the channel (0:43-1:42). Note that the groove is excavated so that it is perpendicular to the direction of flow. This is important to ensure that the flow uniformly approaches the weir. An off axis installation would mean that one side of the weir crest would experience more flow than another – creating an erroneous flow reading.
In siting a weir, ease of installation should be a consideration. Hard, rocky soil should generally be avoided where possible, as considerably more effort would naturally be required to complete the installation. One advantage, though, of a rocky channel is a decreased likelihood that downstream scour will occur.
In excavating the channel for the weir to sit in, it is important that the groove is deep enough to support the weir from shifting out of place – either through upstream undermining or downstream scour.
In this installation, effort is made to cut back sufficiently far into the channel banks on either side – again to support the flume and to eliminate flow bypass.
Moving the weir plate into place, multiple measurements were made to ensure that the weir was both horizontally and vertically level (1:43-2:10). Pã used both a torpedo bubble/spirit level and a plumb bob. As each side was secured, the plum bob was used to verify that the weir was vertically straight.
Because of the channels width, Pã installed long vertical supports on the downstream side of the weir opening to keep the weir from bowing due to hydraulic pressure (2:11-2:27). An additional support was installed downstream on the centerline of the weir crest opening. Frankly it’s a brilliant idea and one that we’ll incorporate on our custom weir plates going forward!
With the weir installed, sand bags were then carried in and installed on the upstream side of the weir (2:12-3:26). Now the top of the sandbags is just below the crest of the weir – closer than we would normally expect to see. Remember that in a natural channel debris will accumulate upstream of the weir. Having the tops of the sandbags so close to the weir crest will likely mean that maintenance will have to be more regular to keep it free of debris.
While there are some issues (weir crest sharpness – sandbag height relative to the weir crest height), all in all the video is very instructive and is a great resource.
Source: YouTube
Related Blog Posts
-
Expert Insights
-
Expert Insights

-
Expert Insights


Explore more insights in our blog.

LOCATIONS IN ATLANTA, GA & BOISE, ID