
While many flumes are grouted into place, a sizable number are also installed in earthen channels (furrows, irrigation ditches, creeks, etc.). The traditional method of excavating the area, packing the earth, installing the flume, and then backfilling with the excavation dirt works well in most applications.
There are, however, times when stabilizing a flume – either during initial installation, or later use – is difficult. The surrounding soil may be soggy, the soil may be easily eroded, or flows may be flashy. Any of these conditions can make installing and maintaining a flume difficult.
Two approaches have been used with success in stabilizing flumes: timber piers and precast concrete bases.
Timber Pier Approach
In the timber pier approach the installation site is excavated and trenches for wooden railroad ties/ sleepers cut perpendicular to the direction of flow. The timbers are placed under each end of the flume as well as the throat for support. The timber piers are extended past each end of the flume, and at times as far as the channel walls to minimize the effects of undercut (upstream) and scour (downstream). Depending upon the application, inlet and outlet wing walls may be formed from additional timbers to armor the channel immediately surrounding the flume.
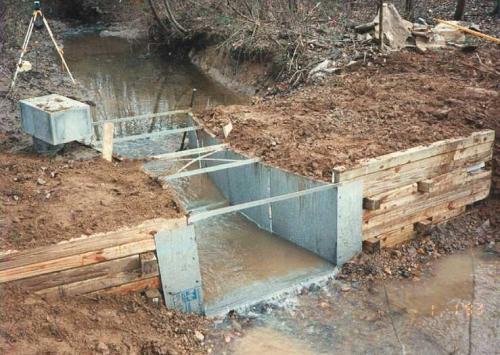
Timbers may be of soft or hardwoods – oak, fir, jarrah, karri, and the like – depending upon local availability. Softwood timbers are usually treated with creosote or other preservatives to improve rot and insect resistance. This is of particular importance in soggy or wet ground installations.
Problems with wood timbers can include: rot, splitting, insects, and spike-pull (when ground spikes are used to secure timbers together). In these instances, different timber composition or treatments may be required. Boron-based wood preservative treated timbers may be used as well as concrete or composite lumber.
Precast Concrete Base Approach
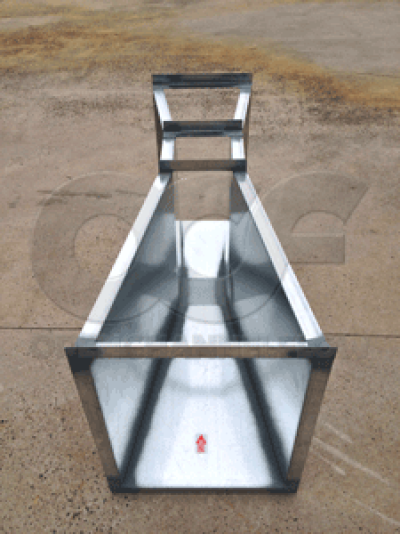
Another method of installing flumes in earthen channels is the use of pre-cast concrete bases. Here a wire reinforced concrete pad of sufficient size to set the flume on and 3 1/2-inchess [8.89 cm] thick is formed off-site. While the concrete is still wet, two or more lengths of stainless steel threaded rod are inserted into the concrete. The threaded rods are placed in such a way so as to be able to pass through and secure to the flanging at the top of the flume (through which holes are drilled to pass the rod through). For flumes with side anchor clips these may be used in lieu of securing the flume through the top flanges. After the concrete is set the flume is then either loosely mounted to it off-site or left loose for field installation and the structure taken to the installation site.
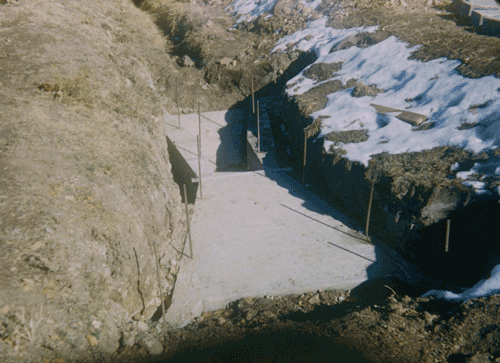
At the installation site, flow is temporarily blocked to allow for the area to be excavated. The area where the pad it to be installed is leveled and the earth packed to provide a firm base on which to set pad on. Trenches at the inlet and outlet of the flume are dug back into the bank 12 to 18-inches [30.48 to 45.72 cm] to allow for inlet and outlet barriers to anchor back into the channel bank. These trenches are extended 3 to 4-inches [7.62 to 10.16 cm] below the channel flow – again to anchor the inlet and outlet barriers and to prevent undercutting.
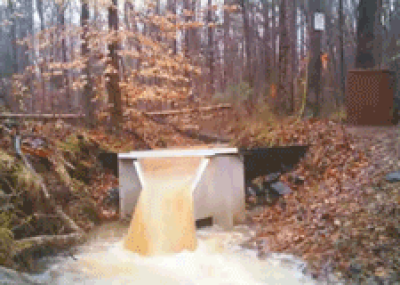
The anchor boards – typically wood, but fiberglass and steel may also be suitable – are then attached to the inlet and outlet of the flume. Tying these anchor boards into the channel banks adds considerably to the stability of the installation and also serves the dual function of minimizing bypass and undercut.
As the flume with the anchor boards is being set, a geotextile (or plastic sheeting depending upon how long the installation is intended to last) can be set between the discharge end of the flume and the concrete pad. The purpose here is to minimize downstream scour and undercut – particularly during periods of high flows. The geotextile can be extended as far downstream and as wide as necessary. As a rule of thumb, downstream armoring should not be less than 4 times the maximum normal depth of the downstream channel, nor less than 5 ft. [1.50 m].
With the flume in place and secured by threaded rods, sandbags are used to fill in around and stabilize the flume. Soil from the excavation can be packed in between the sandbags to further stabilize the installation. Depending upon the sandbag material, sheet plastic cover by dirt may be necessary over the sandbags to protect them from U.V. deterioration. Alternatively, concrete-filled sandbags may be used – potentially providing more long-term stability and reduced maintenance.
Related Blog Posts
-
Expert Insights

-
Expert Insights
-
Expert Insights


Explore more insights in our blog.

LOCATIONS IN ATLANTA, GA & BOISE, ID