Anatomy of a Flume
While it's important to understand the sections of a flume and how they work, it's also important to understand the functional elements of a flume and the purposes they serve.

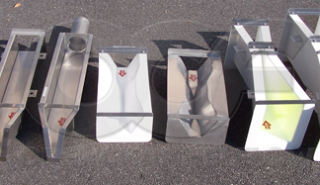
1) Dimensional bracing
2) Interior flow surface
3) Anchor clip
4) Top / end flanges
5) Stiffening rib
6) Flume exterior
Dimensional Bracing
Dimensional bracing is usually installed at the top of the flume to make sure that the flume stays in dimension - that the walls at the top of the flume don't come in / out (thereby changing the flow cross-section of the flume).
At the base of the flume, the floor / sidewall connection holds the flume rigid and in dimension. At the top of the flume, there is no floor to hold the flume rigid. By installing bracing, the top of the flume can be held open and in dimension - while still allowing the operator to access the flume's interior. Without bracing, the flume walls would want to come together – reducing the cross-sectional area of the flume as you go up the sidewall.
Bracing typically takes the form of L or U-shaped angles when mounted above the top of the flume but can also consist of round or square rods (hollow or solid) when mounted just below the top of the flume.
The bracing may be bolted, chemically bonded, or welded to the flume depending upon the flume's construction and bracing.
Even when the bracing is removable, it should always be left in place while the flume is being installed.
If the bracing is removed after installation, it is important to verify the flume's dimensional accuracy.
For flumes with integral bolt-down covers, dimensional bracing may be omitted as the covers themselves serve the purpose of keeping the top of the flume in alignment.
Remember that just because a flume has bracing on it doesn't mean that the flume doesn't need to be cribbed inside during installation. Cribbing helps keep the sidewalls and floor from distorting during installation.
Interior Flow Surface
The interior flow surface of a flume is just that – the surface exposed to the process flow. On a fiberglass flume, the flow surface is the “gloss” surface of the part.
The flow surface of any flume should be smooth and free of scum, build-up, and vegetative growth. Flow surfaces should be inspected periodically and cleaned as necessary.
Anchor Clips
Anchor clips are short L-shaped angles attached (chemically bonded, glassed, or welded) to the exterior of a flume and are used to help stop the flume from floating out of position during installation.
Each anchor clip has a hole drilled through it (typically 5/8” [1.5875 cm] in diameter) to aid in the installation of the flume.
When installing a flume in concrete, the ancho clips are used to key the flume into the concrete. Wire or rebar may be run through the holes in the clips to secure the flume to the channel structure before concrete encasement.
Note that anchor clips by themselves are not intended to prevent the flume from floating or shifting during installation. Sandbags or other materials are necessary to accomplish this task.
On small flumes anchoring clips may be used to secure and level the flume. Threaded rod can be run through the holes in the anchoring clips and secured in place by nuts / washers. This method of securing / leveling a flume is not recommended for medium and large-size flumes.

Top / End Flanges
Flanges on a flume provide rigidity, particularly along long, straight edges. In earthen channel installations, end flanges can be extended to help stop scouring at the flume's inlet / outlet and stop the flow from bypassing the flume.
A secondary use of top / end flanges is to provide a convenient mounting location for dimensional bracing, flume accessories, and end transitions (end adapters and wing walls). As they are not exposed to the flow stream, top/end flanges can be drilled as necessary to accommodate these items.

The top flanges can also be used to run threaded rod through for a suspended flume installation. This approach works only for smaller flumes.
Top/end flanges are not critical flow elements of a flume. As such, limited trimming may be allowed so long as the flume's rigidity is not affected, and any cut (for fiberglass and galvanized steel construction) is sealed.
Stiffening Ribs
Stiffening ribs are provided along the sides and floor of a flume to provide stiffness along flat, unbroken surfaces.
In welded construction flumes (PVC or steel), stiffening ribs are typically L-shaped angles welded to the outside of the flume.
For flumes made out of fiberglass, stiffening ribs are made by securing a form (or shape) to the outside of the flume and then laminating fiberglass over it. Here the fiberglass is what provides the strength / stiffness – not the form or shape. Rib forms / shapes can be made of engineered foam, PVC, or even cardboard.
Engineered foam is the preferred material as it can be designed and shaped to meet the lamination process's needs. Cardboard and PVC rib forms come from standard shapes (U-shaped, round, square) but don't take into account the needs of the laminating process. Poor laminate bonding and interstitial voids around rib shapes made of cardboard and PVC are common.
Flume Exterior
The flume exterior is simply the outside of a flume where anchor clips and some accessories (i.e., attached stilling wells) may be attached or molded. Since the surface isn't exposed to the flow, glass-like smoothness isn't necessary.
If the flume is made out of fiberglass and the exterior will be exposed to direct sunlight during its service life, it's important that a U.V. inhibited gel coat be used on the outside of the flume.