
 When mounting an ultrasonic sensor over a flume or weir one thing that frequently gets overlooked is the blanking distance - aka deadband - of the sensor.
The blanking distance is that distance from the face of the ultrasonic transducer in which the flow meter will blank out (or flatline) the indicated level - or the minimum sensing range in an ultrasonic proximity sensor.
Blanking distance is a function of the ring down time of the transducer as the transducer must ring down before it can receive the sound reflected from the target.
Each flow meter manufacturer has difference performance specification and blanking distance is one of the specifications. Most manufacturers currently market ultrasonic meters with 12" blanking distances, but there are some manufacturers offering blanking distances as small as 6" and as great as 24". It is important, therefore to consult the operations manual for the flow meter when installing it.

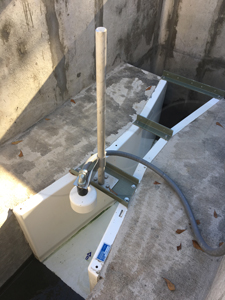
A successful ultrasonic meter installation requires: knowledge of the maximum anticipated flow rate, a flow table for the weir or flume, and an adjustable mounting bracket.
Start first by determining the maximum anticipated level (Hmax) in the primary device based upon the maximum anticipated flow rate (Qmax). To this head a surge or reserve head should be added. The resulting number should then have the ultrasonic transducer's blanking distance added. This is now how far from the zero-reference elevation the face of the transducer should be mounted.
It is important to remember that the zero-reference elevation differs between flume types and between flumes and weirs in general. Palmer Bowlus and RBC flumes have zero-reference elevations ABOVE the floor of the flume (even with the top of the throat ramp). Similarly, the zero for a weir is the crest elevation (generally at least 2Hmax above the weir pool floor). Other flumes (such as the Parshall) have the floor of the converging section as the zero reference elevation.
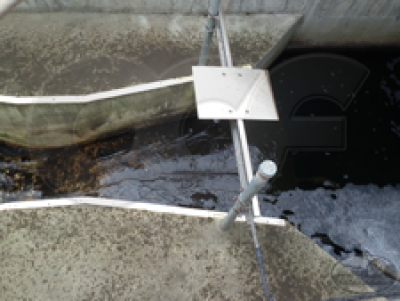
Remember that as the signal leaves the ultrasonic transducer, the sound pulses expand in a cone. Combinations of flume sidewall angles, blanking distance, water height, and flume depth can result in situations where the transducer is mounted so high that the sound pulses reflect off the flume's sidewalls. This reflection occurs at lower heads and can result in a bottoming of he indicated level (showing a constant low level when little or now flow is present).
Image: Teledyne ISCO
Source: Electronics & Telecommunications
Related Blog Posts
-
Expert Insights
-
Expert Insights
-
Expert Insights


Explore more insights in our blog.

LOCATIONS IN ATLANTA, GA & BOISE, ID